--------- LIVING ROOM & FAMILY ROOM---------
It was time for Living Room & Family room update!
 We’ve had our living room furniture for almost 10 years and
it was time for a change! Our current living room's (10 ½ x 16) configuration was
tight but best accommodated what we had. The TV was huge and took up a lot of valuable space. Our current sofa, chaise, and chair along with bulky side and coffee tables made
the room feel smaller than it is. There is also a permanent AC Unit in the wall thatwas a CONSTANT eyesore! The living room is joined to our Family room, or as we
call it “The Blue Room”, by a large 7 ½ wide opening.
We’ve had our living room furniture for almost 10 years and
it was time for a change! Our current living room's (10 ½ x 16) configuration was
tight but best accommodated what we had. The TV was huge and took up a lot of valuable space. Our current sofa, chaise, and chair along with bulky side and coffee tables made
the room feel smaller than it is. There is also a permanent AC Unit in the wall thatwas a CONSTANT eyesore! The living room is joined to our Family room, or as we
call it “The Blue Room”, by a large 7 ½ wide opening. The Blue Room (12x 13 ½) is intended as a formal dining room, but we are a young family so it suits us better to use it as our computer room /office/ dining room/ music room/ art studio /game room......Family Room. The current Blue Room configuration is very open, with the computer desk, printer stand, drumset, a few shelving units and a bar height table with 4 stools. The TV was mounted right above the table which is way too close for the kids to sit and eat in front of and the table was too small for us all to eat together. We'd have to pull the table away from the wall whenever any of us ate while watching TV or if there were more than 2 of us sitting together for a meal, which was at least once a day. Other than that the room's current set up functioned best to our needs.
Click the images below to enlarge


I created these vision boards and floor plan:
 |
| Living Room Vision Board |
 |
| Blue Room Vision Board |

In the Blue room I wanted a dining area (that we didn't have to constantly be pulling out whenever we wanted to sit together or if we wanted to watch TV while eating a meal) without losing the other functions we needed. I decided the best way to execute that is switch the walls the TV and large canvas print were on, and purchase a larger table top for the bar table base I already had. I also got 6 new stools for additional dining seating. I got rid of the printer stand and rearranged the rest of the shelving units I already had and installed a new ceiling fan, since I took the one out of the living room. The ceiling fan light was not as bright as we sometimes need so I also purchased a floor lamp, which I placed on top of the "Art Supplies" shelving unit with a dimmer switch, for whenever we needed bright lighting. I wanted to add funky colorful twist on the wall surrounding the TV, so I ordered the Safari and North American Sets on Cardboard Safari and had the kids make their own designs on them.
Click the images below to enlarge


The Living room now has even more seating and table-top surfaces than before AND is much more contemporary and spacious. When the kids want to play the Wii or
Kinect the “coffee table” slides right under the Floating TV Stand and there is
plenty of space for them to jump around.
The Blue Room now has a more formal dining area with
additional seating while still maintaining all the purposes we require of the room.
We are extremely pleased with our new Living & Blue Rooms!
For more pictures Click Here!
--------- LIVING ROOM & DINING ROOM---------
I recently updated our upstairs hallway & stairwell and wanted to continue that same sophisticated, glamorous look for our downstairs living areas, including converting "The Blue Room" into a formal dining room
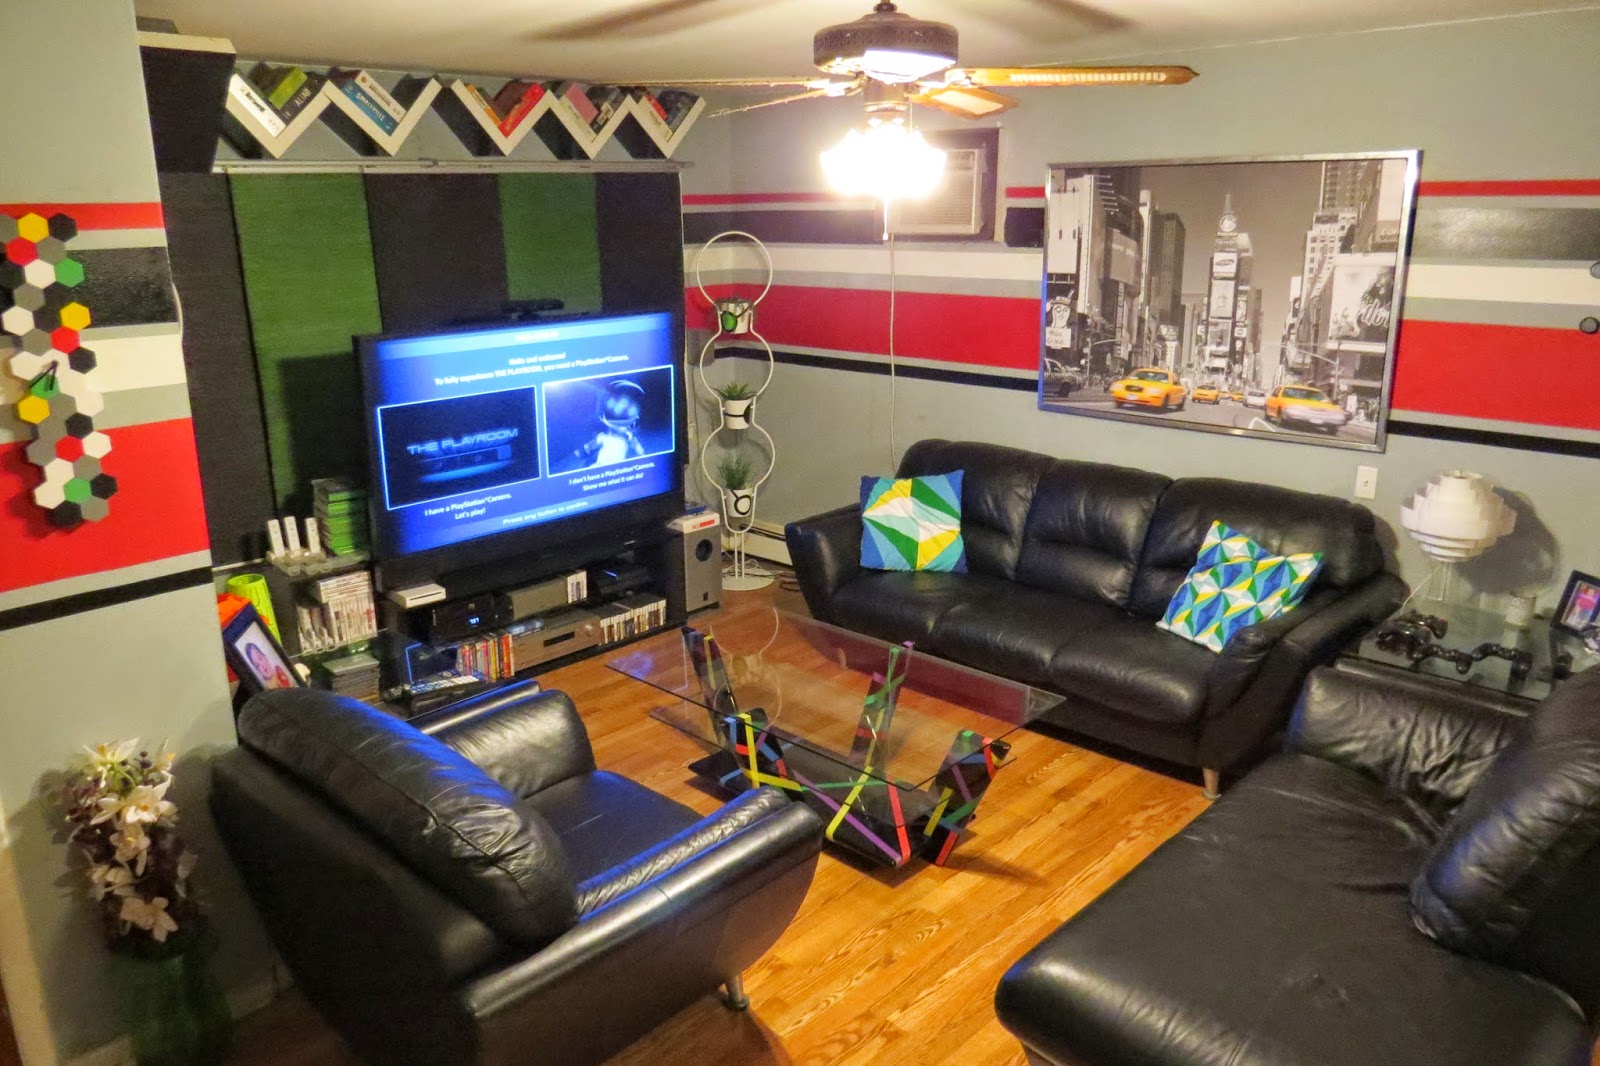
 Our current living room (10 ½ x 16) has a large black leather sectional, colorful accent chairs, 2 modern black side tables, and to conserve floor space, a wall mounted 3-D Smart TV and floating wall mounted TV stand with console and DVD storage. We have a 60" espresso slat bench with a custom cut piece of glass on top of it as our coffee table that is large enough for the sectional, but doesn’t compromise floor space. When the kids want to play the Wii or Kinect the “coffee table” slides right under the Floating TV Stand and there is plenty of space for them to jump around. I installed a panel bracket system (the same I used for my panel curtains) to the wall above the in-wall AC unit, and hung a large poster print so that whenever the AC wasn't in use I could slide the poster in front of it. To store all the video games and controllers I built a small 2 shelf unit the same width of the wall next to the opening between the rooms, painted it the same color as the wall, and attached stainless steel legs to raise it so it would clear the baseboard heaters. We have light gray walls with black, white, blue, and green stripes throughout the living room. I painted a larger bottom stripe with various shaped colors broken up by silver lines on the wall leading to the stairs, and hung picture frames. I have 3 Ikea Nils stools along the wall for additional seating. We also have a small modern fish tank on a tall acrylic stand against the wall next to the stairs landing.
The living room is joined to our Family room, or as we call it “The Blue Room”, by a large 7 ½’ wide opening. “The Blue Room” (12x 13 ½) is our computer room /office/ dining room/ music room/ art studio /game room. The current Blue Room configuration is very open, with the computer desk, drum set, a few shelving units and a bar height table with 6 stools. The ceiling fan light was not as bright as we sometimes need so I also purchased a floor lamp, which I placed on top of the "Art Supplies" shelving unit with a dimmer switch. I ordered Cardboard Safari animal heads and had the kids make their own designs on them and hung them on the wall surrounding the TV.
Before
The living room didn’t need much change aside from paint and some accent pieces, but The Blue Room needed a complete makeover!
I created these vision boards and floor plan:
 |
| Living Room Vision Board |
 |
| Blue Room Vision Board |
 I painted the wall between the entryway and stairs the same dark gray I used for the upstairs hallway and stairwell. I purchased a console table and large round mirror to go on the wall. I cut and glued plywood cut outs to our bland plywood door and painted it glossy black, and trim a bright white. I painted over all the stripes with the same light gray paint I already had on the walls in the main living room. I replaced the 2 blue and green accent chairs with Tufted Light Gray Linen chairs, and replaced the colorful pillows and throw on the sectional with black, white, and gray -with metallic silver and gold pillows and a faux white sheepskin. The colorful curtain panels were replaced by dark gray panels and a pleated white shade. The small 1 bulb ceiling light we currently had was too dim for the size of the room so I replaced it with a 5 spotlight ceiling light. We now have a lot of natural light well into the evening and ample light at night.
I spray painted all our decorative accents either gold or silver, including one of the black side tables I placed the “AK 47” lamp I made on.
“The Blue Room” was officially changed to “The Dining Room”
I painted the walls the same light and dark grays used in the hallway and living room, painted the closet door glossy black, and all the trims bright white. I replaced our metal blinds with the same light filtering pleated white shades I used in the living room, and mounted our TV onto the middle beam of the double window sill, and installed 2 double spotlights over the window. I replaced the ceiling fan with the same 5 spotlight ceiling light I used in the living room.
I converted the smaller shelving unit that used to store the art supplies into a TV/CPU/Router/Game console storage unit. I cut 2 fiberboard panels, painted them white, and used Diamond knobs I had left over from my Master bedroom makeover and mounted them using self-closing hinges. I purchased a set of 2 nesting console tables and placed the shelving unit under the larger of the 2, and centered them under the TV in from of the window. Now our television serves as the CPU monitor as well, and I eliminated our old Bulky CPU Desk! I purchased 2 Chesterfield Dark Grey Tufted Velvet Arm Chairs to flank the new “TV console stand”. I used one of the white fur stools I made as a small side table/ foot rest, and hung floating succulents of varying shapes and sizes at different heights, from the ceiling over one of the chairs.
I combined the 2 bigger shelving units I had (1 horizontally and 1 vertically) to make one large storage/display/buffet cabinet. I painted more silver and gold shapes onto the already painted black and white doors. I painted the inside of the open shelves gold and added lighting strips. I had a large wood framed mirror that I spray painted gold and hung it over the horizontal unit. I also spray painted some of the hexagon pieces of a clock gold and hung it on that wall.
I used the smaller of the 2 nesting console tables as our desk, and placed the other 2 white fur stools I made under it. On the wall over the desk I made a collage of the varying picture frames I had. (I spray painted some of them gold). I re purposed our utility cart as bar cart and purchased a new dining room set with an expandable glass dining table and 6 modern clear dining chairs that look spectacular!
After


------------- MASTER BEDROOM-------------
It was time to update our Master Bedroom!
 |
| Floor Plan |
After 5
years it was beginning to feel dated and we had a serious lack of clothing
storage. Our bedroom (13 ½ x 11) has
a large window across, and a closet door to the left of the entry door, leaving one wall to center
the bed. The current arrangement we had
only allowed for our king sized bed and 2 small nights stands on either side, and 2 Ikea lack shelving units stacked horizontally across from the bed.
 |
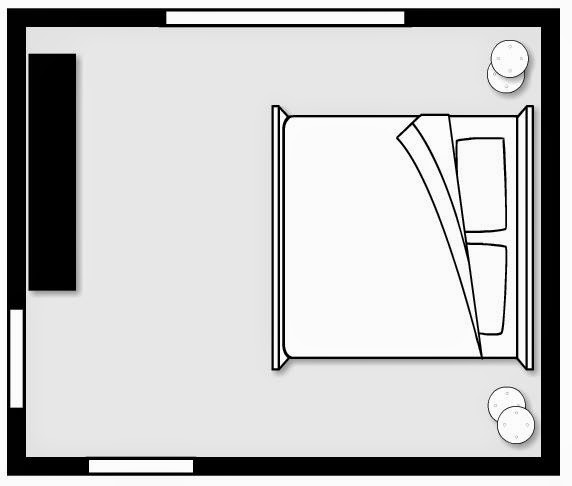
| New Floor Plan |
For my new plan I decided to place the bed along the windows in order to accommodate 7(!) additional Ikea Malm storage units: 2- 2 drawer chests, 2-4 drawer chests, 1-3 drawer chest, 1- 6 drawer chest, and 1- 6 drawer dresser. I arranged the 2- 4 drawer chests, with the 6 drawer chest between them, along the wall that the closet door is. I put he 3 drawer chest & 6 drawer dresser under the TV along the wall that the entry door is on, and across from that the bed and 2- 2 drawer chests as night stands. Being that the bed could not be centered with the window, and our Ikea Malm bed has such a low headboard, I hung up drapes from the ceiling to floor, behind the bed to create the illusion of a headboard and that the bed was centered.
I wanted the room to be Romantic and Glamorous.
I created the vision boards below:

I wanted to customize the Malm units so I ordered the "Caci" overlay from O'verlays and “diamond” knobs from Amazon for them. The possibilities for this are endless!
 |
| Knob Patterns |
 |
| Silver Overlays |
 |
| Black Overlays |
I had many scenarios, as you can see, but chose the one below.
I spray painted the overlays black and glued them to the top drawers of the units, and attached the knobs to the rest of the drawers.

The night stands are bit small so I rigged Ikea Knappa Pendant lamps over them and ran the cords behind the curtains, and attached Ikea Dimma dimmer switches to them.
I already had 2 Ikea Ung Drill frames from my previous "headboard" , so I painted them metallic silver to flank the TV.
Below are the results and I am VERY pleased!

------------- KIDS BEDROOMS-------------
My children wanted to update their bedrooms, and after about 4 years since moving in I agreed (plus I LOVE interior design, so I didn’t need convincing!) Not only did they want new rooms, but they wanted to switch bedrooms!

My son, Lorenzo, had the smaller room (roughly 7 x 11 ) with a large window, double sliding
door closet, and the entry door all on different walls. Being that the
room is so small, and has little wall space for furniture to work with; I put a
twin loft bed in there in order to accommodate room for the rest of his storage
and make the room feel more spacious. Under the loft bed I was able to have adesk, chair, and 2 Ikea Malm chests (3 drawer and 2 drawer). Along the wall with the
window I placed 3 Ikea Lack shelving units (2 horizontally and 1 vertically), and on
the wall across the bed I placed 3 storage ottomans which added additional seating. My
son enjoyed his room for years but he was ready for a change!


My daughter, Sabrina, had the larger room (roughly 9 ½ x 10). She had a Disney Princess themed room with a castle bed and all. She had a wardrobe, large dresser, Castle loft bed with slide, and a whole bunch of toys.I removed the sliding doors and stored the wardrobe in the closet, and arranged the rest of the furniture to best accommodate her toys and other play furniture. She loved the room for years, but had now out grown it. She wanted to get rid of the Princess stuff and have a “Big girl” room.

I sat down with them both and asked what they wanted in their new rooms:
Lorenzo: A Larger bed, a nice desk area, a Flat screen TV with a
Roku player, Gray walls, and Blue and Green accent colors. I created these Vision Boards with him:

 |
Floor Plan |
 |
Original elevation plan |
 |
Final elevation draft |
Final results
Sabby: A Daybed, a Flat screen TV with a Roku player, a desk, Paisley prints, Turquoise walls and bright colord accents. I created these Vision Boards with her:

 |
Elevation Draft |
 |
Floor Plan |
Final results
For more pictures click here!
-------Lorenzo's Bedroom Update 2017-------

My son's room (roughly 9 ½ x 10), has a queen sized bed, closet desk, some storage stools, and 2 horizontally stacked lack units with bins as his clothing storage. Gray walls, and Blue and Green accent colors.
I sat down with him and asked what he wanted to update:
-Dark Gray walls-More clothing storage, with traditional sized drawers, without sacrificing floor space and his queen sized bed.
-Graffiti and urban decor
We made a vision board

We purchased a queen platform bed with 12 standard sized drawers in the base that provides ample storage, and placed the head of the bed on the largest wall with a large graffiti mural over it.
For additional storage and "night stands" we used a total of 12 Ikea Trones storage units around the walls and flanking the bed and placed fiberboard that I cut and painted white, on top of it to serve as a counter tops. We mounted the floating shelves on both walls perpendicular to the graffiti mural.
We painted the "closet desk" walls all black, and added turntable decals to the custom built desktop. For lighting I hung string lights around the inner door frame and ceiling of the closet, along with a desk lamp, and mounted the TV on that wall over the desk. I purchased a black leather and chrome bench for seating and shoe storage, and place the drum set to the left of the desk.
FINAL PRODUCT
-------Sabby's Bedroom Update 2017-------
Floor Plan
 |
My daughter's room (roughly 7 x 11 ) with a large window, double sliding door closet, and the entry door all on different walls. She has a daybed, a desk, a lack storage unit, and 2 large pieces (drawers chest and armoire) from her original nursery furniture as her clothing storage.
Paisley prints, Turquoise walls and bright colored accents.
Click here to see on Ikea Share Space!
For more pictures click here!
I sat down with her and asked what she wanted to update:
-Colorful Floral Wall paper, white walls-Reading nook
-Closet Desk
-More clothing storage, with traditional sized drawers
We made a vision board and new layout

 We kept the daybed in the same spot and the new dresser across. There is not enough room for a reading nook so I purchased a hanging chair and placed it next to the bed where the desk used to be. We pulled everything out of the closet, painted it all black, and built a custom shelf and desk with graphic and glass top in the closet. For lighting I hung string lights around the inner door frame and ceiling of the closet, along with a desk lamp.
 Final Product
----------Hallway Update----------
It was time to update our “Art Gallery” hallway.
All our kid’s art was nice, but I wanted an Elegant Modern look.
 |
| Vision Board |
We added thin plywood and trim to our doors to cover some of the damage caused by kids and dogs, then painted them semi gloss black (3 coats).


We spackled, sanded, and painted all the walls gray.
I chose a bright white for the trim and moldings for a bold contrast, and to make the walls and doors pop.
I converted our Lack storage units into a padded storage bench, and added some decorative pillows

I mounted 6 Ikea Trones Storage cabinets to the wall under the picture frames collage. I placed a long piece of fiberboard, that I cut and painted white, on top of it to serve as a counter top for the decorative accents and my samurai sword.


I made another picture collage for the stairwell.
I mounted a full length mirror and small vase with flowers on the floor at the top of the stairs.

Finally we added an 5 spotlight ceiling light fixture to replace the old dim 1 bulb one.

We are very happy with our updated Elegant hallway
Click here for more pictures
---------Mudroom---------
There is a tiny mudroom between my front door and main living area. Its about 5 1/2 x 5 1/2, with both doors centered on opposite walls.

Finding functional storage that fit was tricky.
I purchased the Ikea Children's Odda storage unit that combines a rolling hamper, drawers, and a clothes tree. This unit met my exact need for stylish compact storage and seating.
For wall decor I purchased a canvas print and arranged 5 Ikea malm mirrors over the top and along the right side of it.
To add visual interest, as well as functionality, I replicated the same style of the "clothes tree" and made 2 wall mounted "hooks" for the wall adjacent to the storage unit.
I mounted an Ikea Billdal Mirror on the wall across from the unit and placed an Ikea FÖRÄNDRAD Vase, that I spray painted black, with a smycka Gladiolus flower in it under the mirror. On the storage bench I placed 2 cushions (2 inner cushions covered in Ikea Nils Eslöv Black/White pattern )

Vision Board
Finding functional storage that fit was tricky.
|
| Vision Board |
 |
| Floor Plan |
 |
| Final Product |


-------------KITCHEN UPDATE---------------
My kitchen was in desperate need of updating!
When we first moved in the walls were all beige and worn, there was a white fridge and the rest of the appliances were black. I used stone contact paper as "back splash", painted the walls green, and added a Tuscan Retreat wall border and window valance.


.JPG)
.JPG)
After 6 years it was definitely time for a change!
I painted the walls a dark Chocolate Brown (with 2 kids and 2 large dogs the walls get a lot of marks, especially on the lower half). I simply replaced the old wooden knobs with Antique Brass Knobs and installed Smart Tile Back splash. I built a custom kitchen counter top and storage unit and incorporated the same Smart Tiles and Antique Brass Knobs. I ordered 2 large poster prints and added a Greek Key marble wall border over the cabinets to lighten up the kitchen and add contrast to the dark walls. And purchased a wine rack that both cleared the top of the fridge and is a nice vertical interest piece to the wall.

Vision Board
I am very pleased with the kitchen update!


When we first moved in the walls were all beige and worn, there was a white fridge and the rest of the appliances were black. I used stone contact paper as "back splash", painted the walls green, and added a Tuscan Retreat wall border and window valance.
After 6 years it was definitely time for a change!
I painted the walls a dark Chocolate Brown (with 2 kids and 2 large dogs the walls get a lot of marks, especially on the lower half). I simply replaced the old wooden knobs with Antique Brass Knobs and installed Smart Tile Back splash. I built a custom kitchen counter top and storage unit and incorporated the same Smart Tiles and Antique Brass Knobs. I ordered 2 large poster prints and added a Greek Key marble wall border over the cabinets to lighten up the kitchen and add contrast to the dark walls. And purchased a wine rack that both cleared the top of the fridge and is a nice vertical interest piece to the wall.
|
| Vision Board |
I am very pleased with the kitchen update!
----------MY SISTER'S 1ST APARTMENT-------------
My sister moved into her first apartment and asked me to help her decorate the small space.
The walls, ceiling and floor were all a neutral off white color and my sister did not want to paint. She was on a tight budget but wanted a bright stylish contemporary space.
.jpg)
.jpg)
.jpg)
.jpg)
We purchased a white faux leather couch that also converts to a bed for whenever she has guests sleeping over. We selected a black TV stand and compact black coffee table and end tables. The pillows, throw, mosaic rug, and Damask Turquoise accent chairs added bold splashes of color to give the room a bright airy feel. I hung up light gray curtains floor to ceiling behind the couch and mounted a medium sized round mirror over the couch that reflects the large custom nail head framed artwork on the wall across from it. I printed 2- 4x6 colorful bird prints I found on Pinterest and framed them with inexpensive plain green frames. There is no light fixture in the living room so we placed a floor lamp in the corner and a table lamp on the side table. In the kitchen installed a fun colorful wall decal over the bar height table.


------------- HEAD BOARD HACK-------------
I used 5 Ung Drills to make this “headboard”

I used 3 to frame same fabric as comforter and cut the other 2 for the surrounding pieces.
I cut 1 in a “+” pattern (vertically in half, then again horizontally) for 4 small pieces , and the other in a “Y” pattern for the other 3.

I hung the 3 frames over the bed, the middle one upside down, and placed the other pieces around it as pictured below.

Click here to see my Headboard featured as Pick of the Week on Ikea Share Space!
Click here to see my Hack on Buzz Feed!
----------- Animal Trophy Wall Decor -----------
I wanted to add funky colorful twist to my Family room, so I ordered the Safari and North American Sets on Cardboard Safari
 |
Safari Set
 |
North American Set
I ordered them in white and had my children customize them:


------------- Nail Head Art------------
My Sister wanted a framed contemporary art for the living room of her 1st apartment.
I searched online and found this picture and ordered poster
size print.

I had an old black frame in my garage to frame it with, but
it was just too plain so I went to the dollar
store and bought a box of thumb tacks and used a hammer to nail them into the
frame.

The total cost came out the $13, and my sister lived her new art piece.

----------"Art Gallery" Hallway----------
Our upstairs hallway had just plain white walls and I wanted to liven it up.
My children have PLENTY of art work to display so I decided to turn our upstairs hallway in a their very own “Art Gallery”
.jpg)
.jpg)
.jpg)
.jpg)

.jpg)
.jpg)
No comments:
Post a Comment